
The new “Fee Estimator” feature allows users to create “Opportunity Line Estimates” where Labor and Expenses are forecasted during the opportunity lifecycle.
- Multiple Estimate versions can be created for the same Opportunity line.
- Estimate versions can be Copied and/or Duplicated whenever necessary.
Users can easily plan budgets for different project stages in one place. Switch between versions and make changes in the same spreadsheet, save time and provide accuracy. All your estimates are securely stored for future reference. Plus, these estimates automatically follow the project when it starts, ensuring everything matches up.
- Win deals with accurate estimates you can depend from Fee Estimator spreadsheet.
- Clear budgeting leads to happier clients and smoother projects.
Configuration
The highlighted section below shows the essential setups that System Adminstrator must configure to use the Fee estimator feature. This feature can be activated in the Parameters.
Go to Settings > General > Parameters -> Project360 -> Enable Fee Estimator

Details of fields required for Fee Estimator are as followed:
| Fields | Description |
| Enable Effort Assignment | Set as “Yes” to activate the new projects360 “Effort Assignment” spreadsheet within the Project form. |
| Enable Effort Allocation | Set as “Yes” to activate the projects360 “Effort Allocation” spreadsheet within the Project form. |
| Enable Fee Estimator | Set as “Yes” to activate the new projects360 “Fee Estimator” spreadsheet in the Opportunity Line form. |
Fee Estimator
The Fee Estimator will help users to define project estimates and budgets for different phases. They can switch between versions to build estimates in one place and make changes easily in the Fee Estimator Spreadsheet. It ensures all estimates are stored in Dataverse for future reference and can be used during project execution.Overall, this new functionality will make the estimating process more efficient and organized for Sales Team.
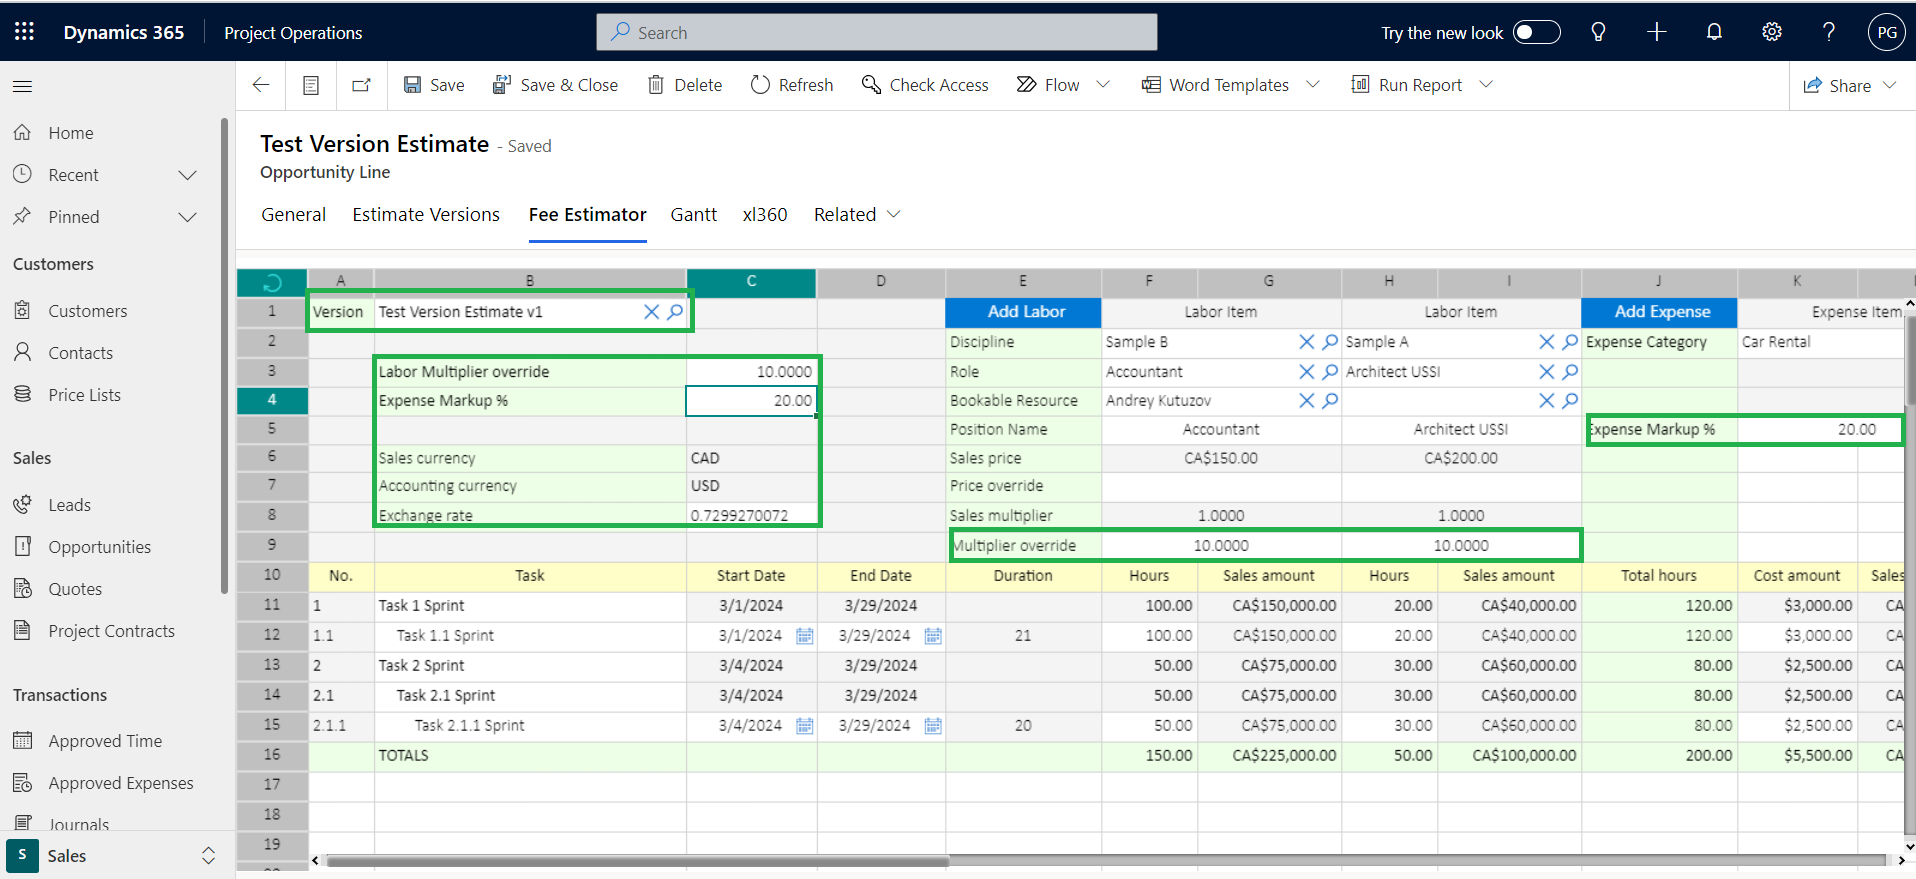
- Open the “Fee Estimator” tab. You’ll see the current version of your estimate.
- Just hover over the “Version” field and choose the version you want to work on. Any changes you make will be saved automatically. You can switch between versions anytime.
Below the “Version” field, there are additional fields you can use to build your estimate. To help you understand what each field means, we have added clear explanations right next to them.
| Fields | Description |
| Labor Multiplier override | Based on the selected Version in the Fee Estimator Spreadsheet, the value will automatically fill in from the Estimate Version. If no input has been provided in the Estimate Version, the field value will be left blank. The value in the Labour Multiplier Override field always changes when the Version is changed. |
| Expense Markup % | If you choose a Version in the Fee Estimator Spreadsheet, the value will fill in automatically from the Estimate Version. If there’s no input in the Estimate Version, the field will be left blank. The value in the Expense Markup percentage field changes whenever the Version changes. |
| Sales Currency | The “Sales Currency” field shows the currency of the Opportunity. This sets the currency for all estimates related to that opportunity, no matter which version you’re working on. It automatically fills in this currency in the Fee Estimator spreadsheet and won’t change even if you switch versions. |
| Accounting Currency | The “Accounting Currency” field shows which company currency the opportunity belongs to. This currency applies to all versions of the opportunity’s estimated costs. It automatically fills in the Fee Estimator spreadsheet and stays the same, no matter which version you’re working on. |
Besides the fields connected to different estimate versions, here are some extra steps to help you get the most accurate budget for roles and expenses:
| Fields | Description |
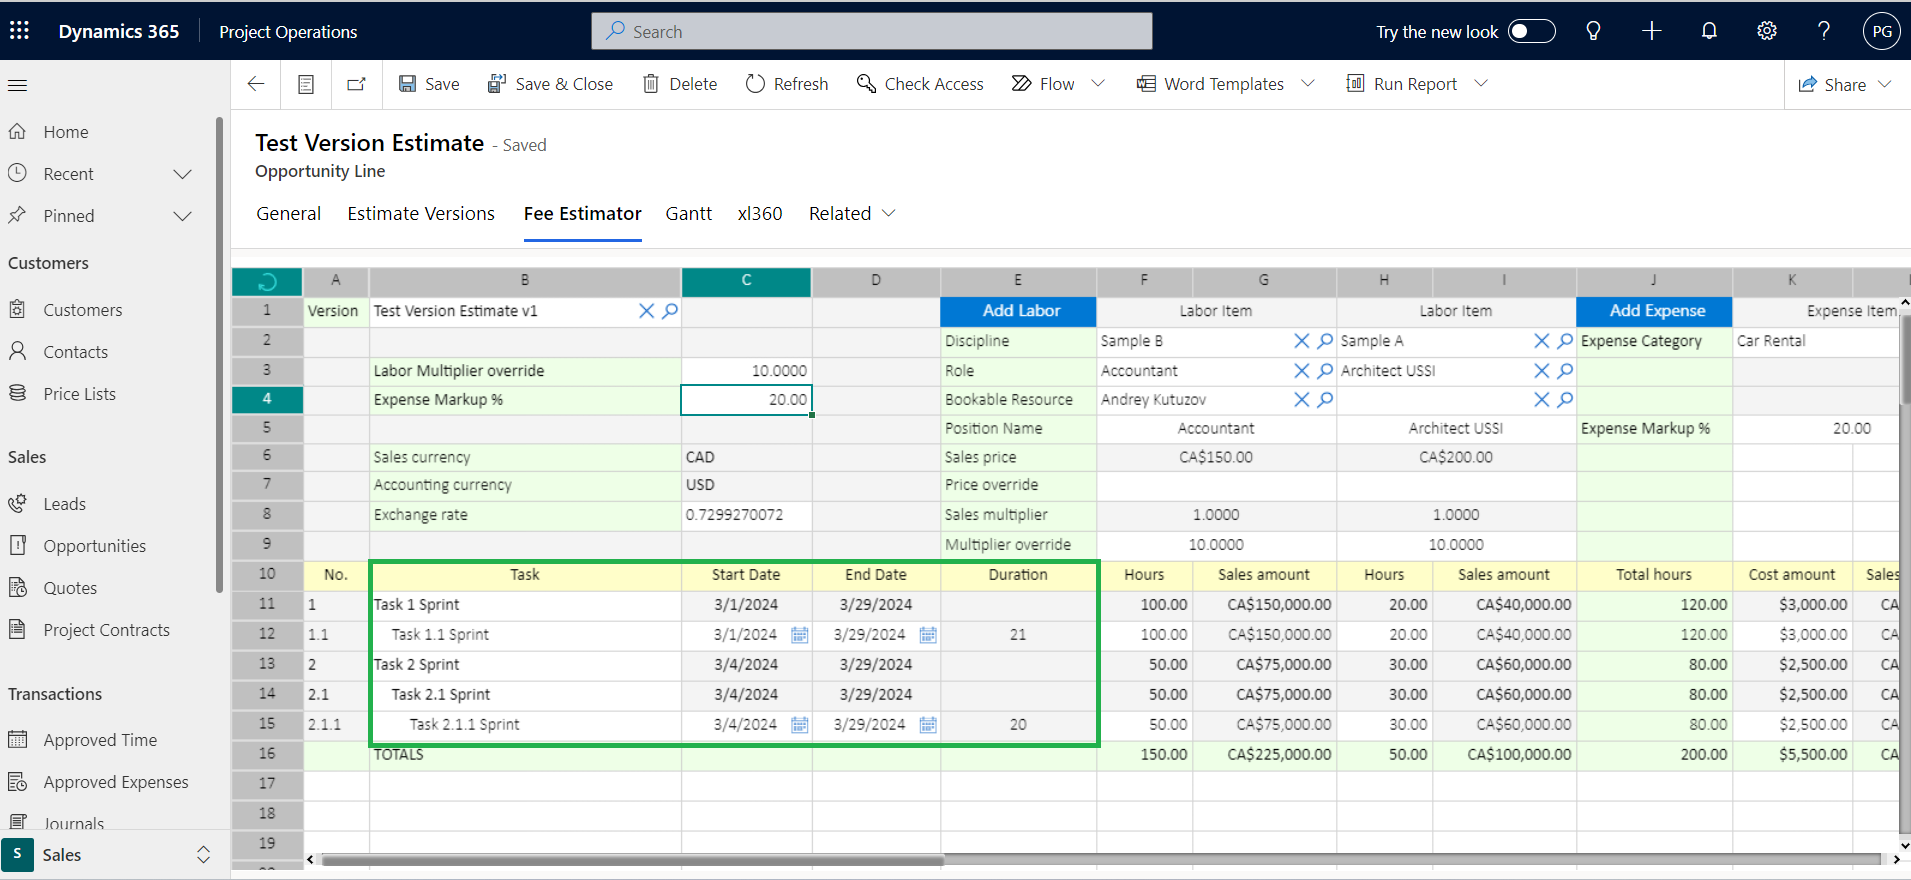
| Tasks |
|
| Start Date | Choose the specific date the task will start. |
| End Date | Choose expected completion date for this task. |
| Duration |
|
Fee Estimator feature includes two key buttons designed to streamline both role and expense budgeting, facilitating a more efficient process.
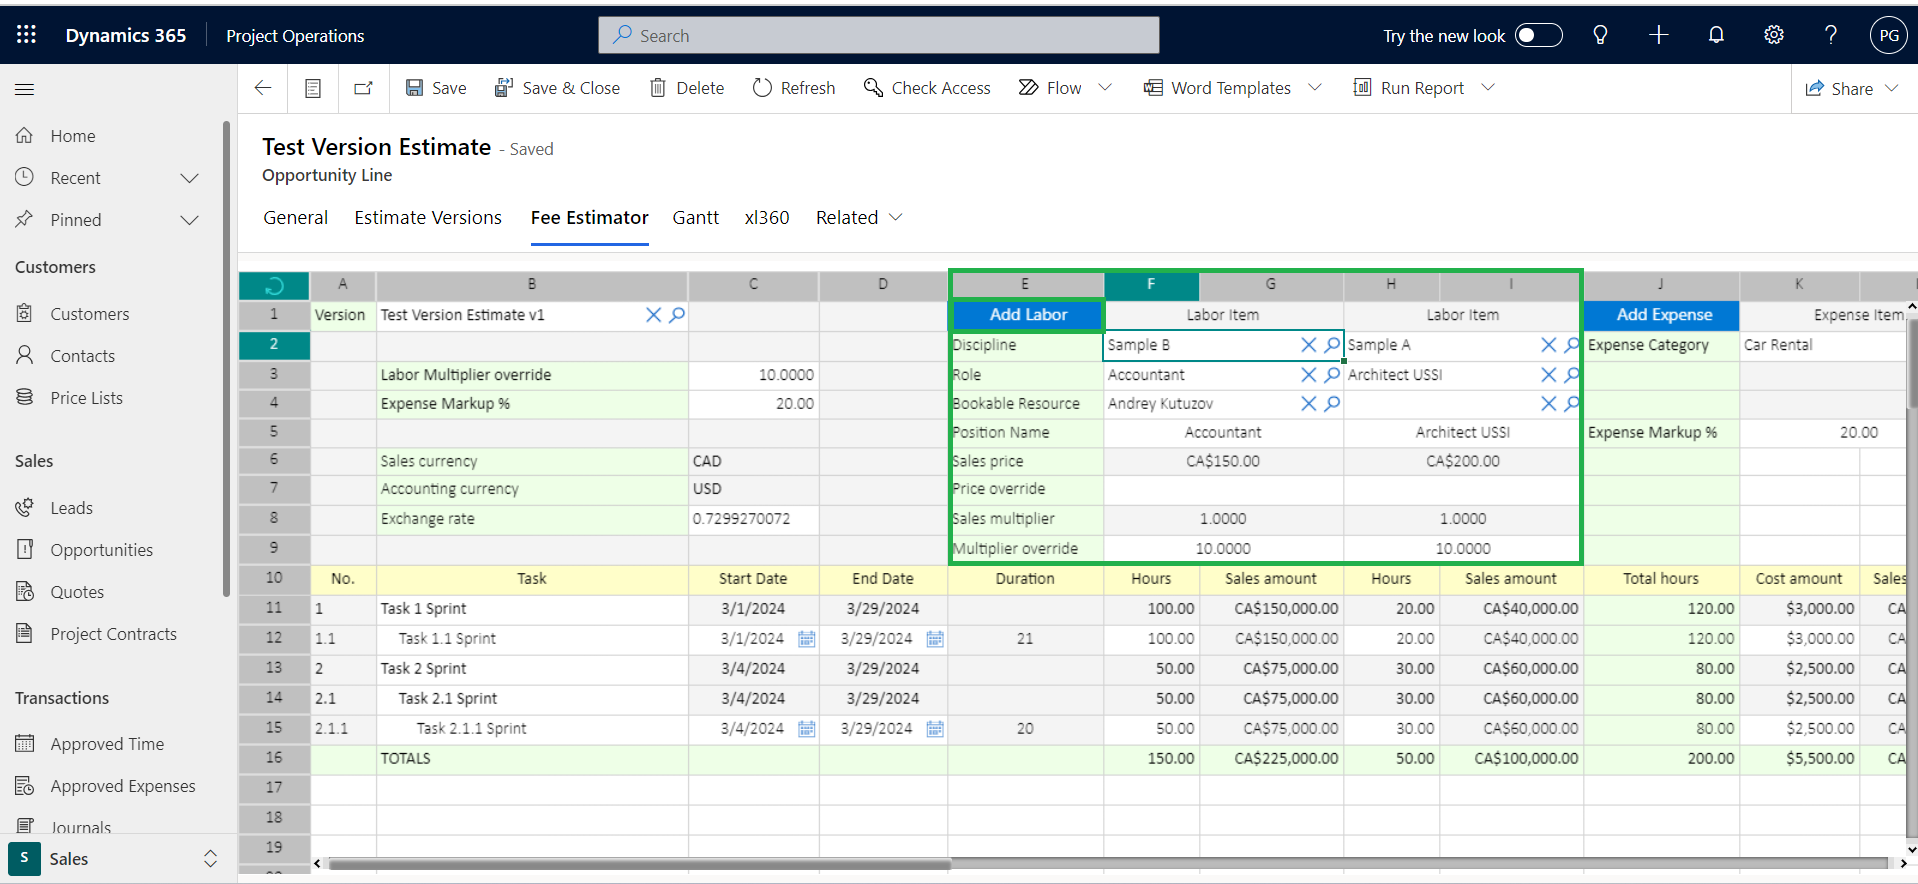
- Add Labor Button
Add different resources to work on a task, Click the “Add Labour Button”. This will open a menu or window where you can choose the roles you need and set their budgets. Click the button as many times as needed to add more resources. Once you click, you’ll see these fields to fill in the details:
| Fields | Description |
| Role | Users can choose any role that’s already set up in the system. The list will show all the resource categories that are currently active. |
| Bookable Resource | Click the dropdown menu of Bookable Resources and choose the resource you want from the list. Bookable Resource is an optional field and can be left blank and users can only select the role, blank resources will be interpreted as generic resources by the system. |
| Position Name | When users choose a role, its description will default from the selected role. |
| Sales Price | The Sales Price value will be populated from the Sales Price list related to the Opportunity. |
| Price Override | Users can enter custom price here, and the system will automatically calculate the total sales amount based on that price, instead of the roles usual sales price. |
| Sales Multiplier | The Sales Multiplier will be populated from Sales Price List markup and if there is no markup then it is defaulted as “1”. The Sales multiplier will be applied on top of Sales price to calculate the final Sales Amount. |
| Multiplier Override | Multiplier override allows to override the value of Sales multiplier and will be applied on top of Sales price to calculate the final Sales Amount. |
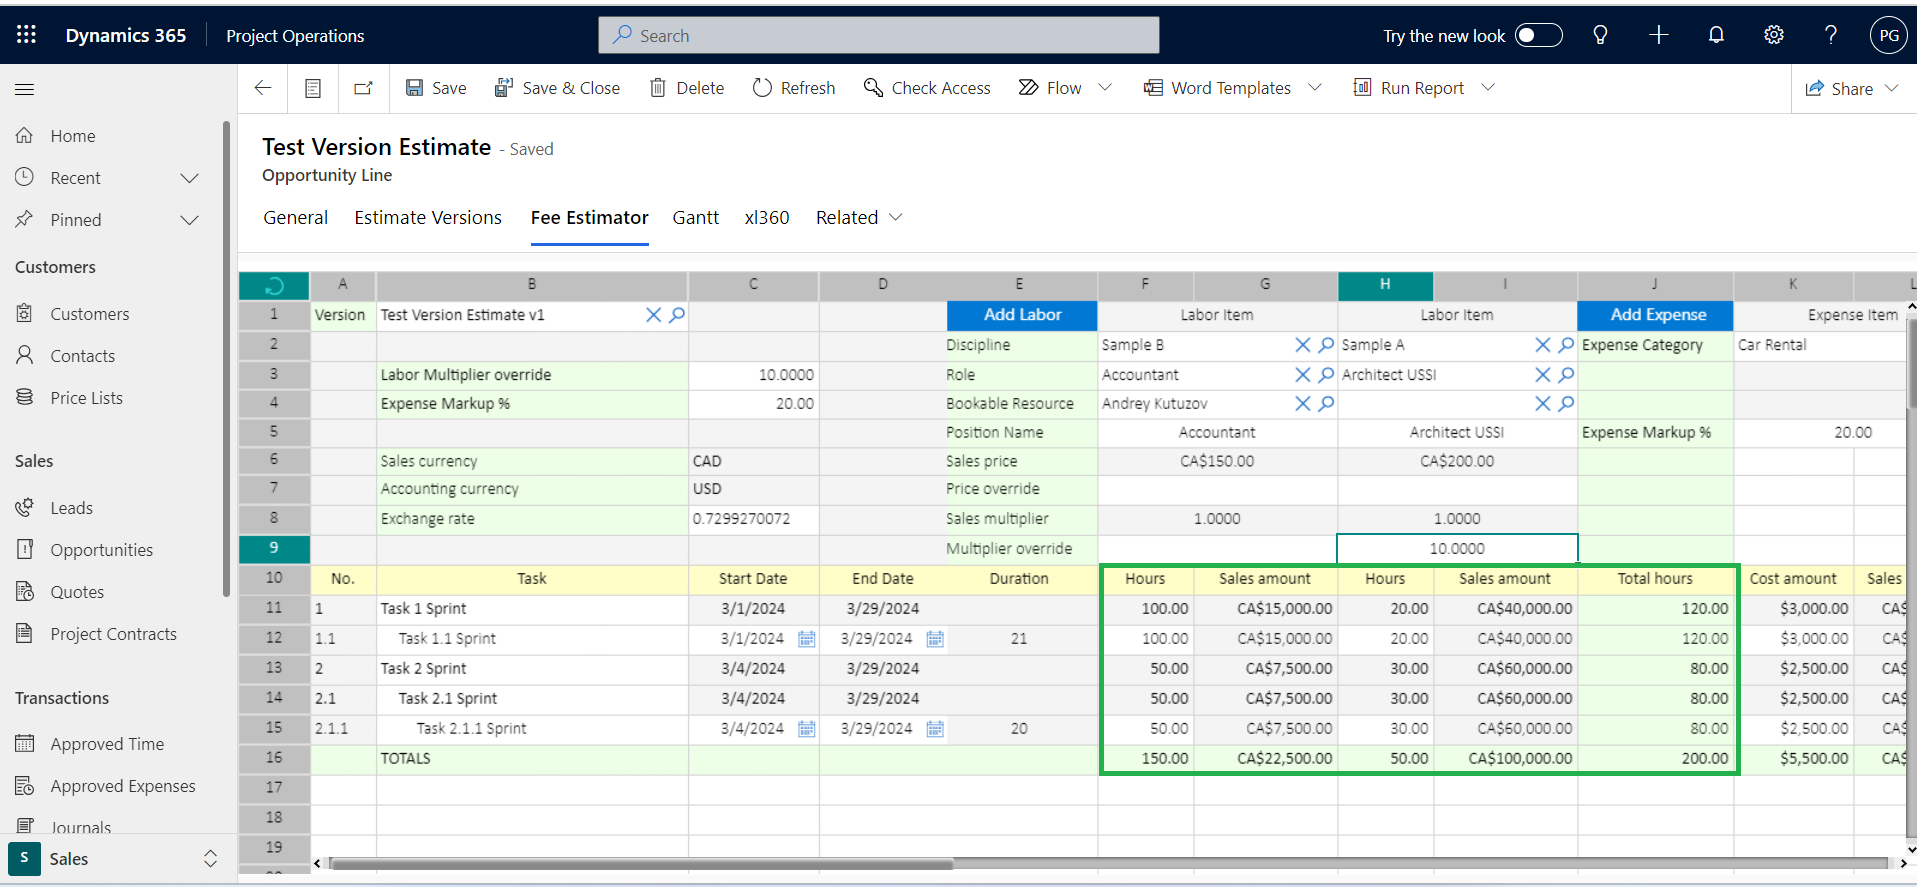
Users also have the flexibility to view different Cost and Sales Estimations for Roles . This helps them to get an overview of the forecasting and make necessary adjustments if needed. Once labor items are added , users will be able to see below fields under different labor items.
| Fields | Description |
| Hours | Users must manually input the total number of hours for the labor they will perform on a particular task. |
| Sales Amount | There are two ways to calculate the Sales Amount of Labour, depending on the scenarios stated below:
|
| Total Hours | Sum of all the estimated work time for your project. There are two ways of calculating Total hours:
|
- Add Expense Button
- Click the “Add Expense Button”, this opens a menu/window where you can easily add a budget for as many expense categories you need.
- Once you click, the following fields will appear for you to fill in:
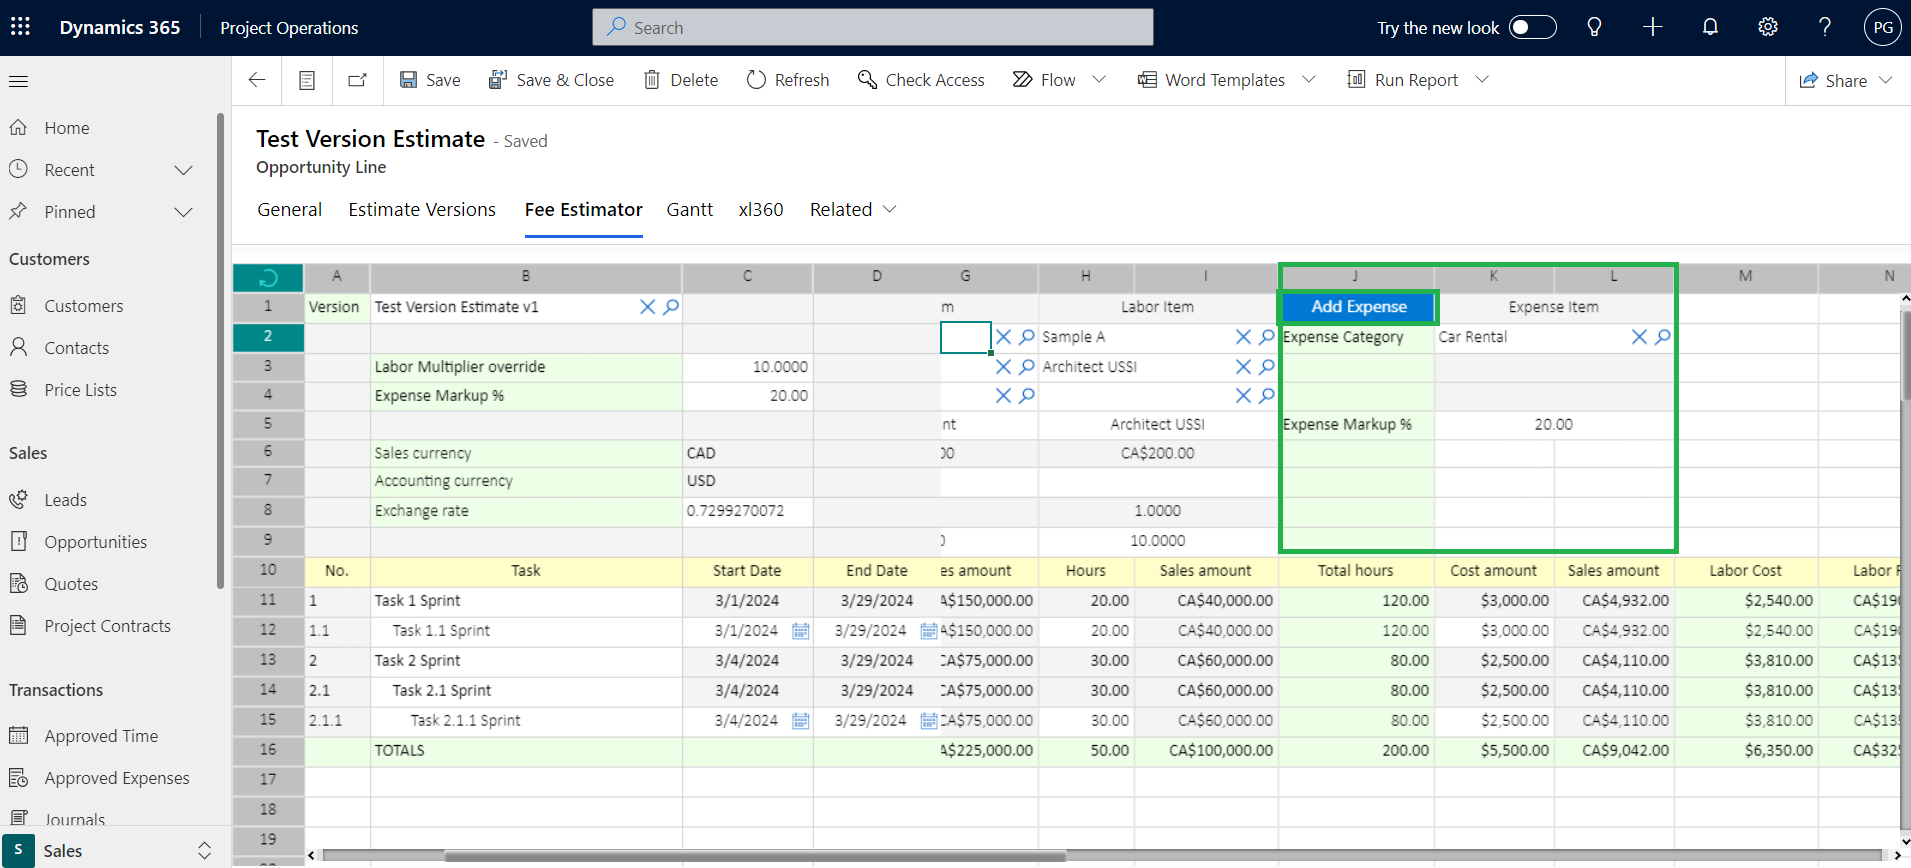
| Fields | Description |
| Expense Category | In the “Expense Category” field, users will see a list of all the active expense categories currently available in system. |
| Expense Markup % | This field will be automatically populated from the version you selected, with flexibility to manually change. |
After adding expenses and filling in the details, you’ll see both the cost and sales amount for each expense. Here is detailed explanation of the fields:

| Fields | Description |
| Cost Amount | Users need to enter the cost amount for each expense they added under a expense category. |
| Sales Amount | Sales Amount calculation varies with Sales and Accounting currency, can be demonstrated with help of some scenarios:
|
There are even more useful fields in the WBS spreadsheet for managing expenses and roles. Here are the fields description highlighted below.
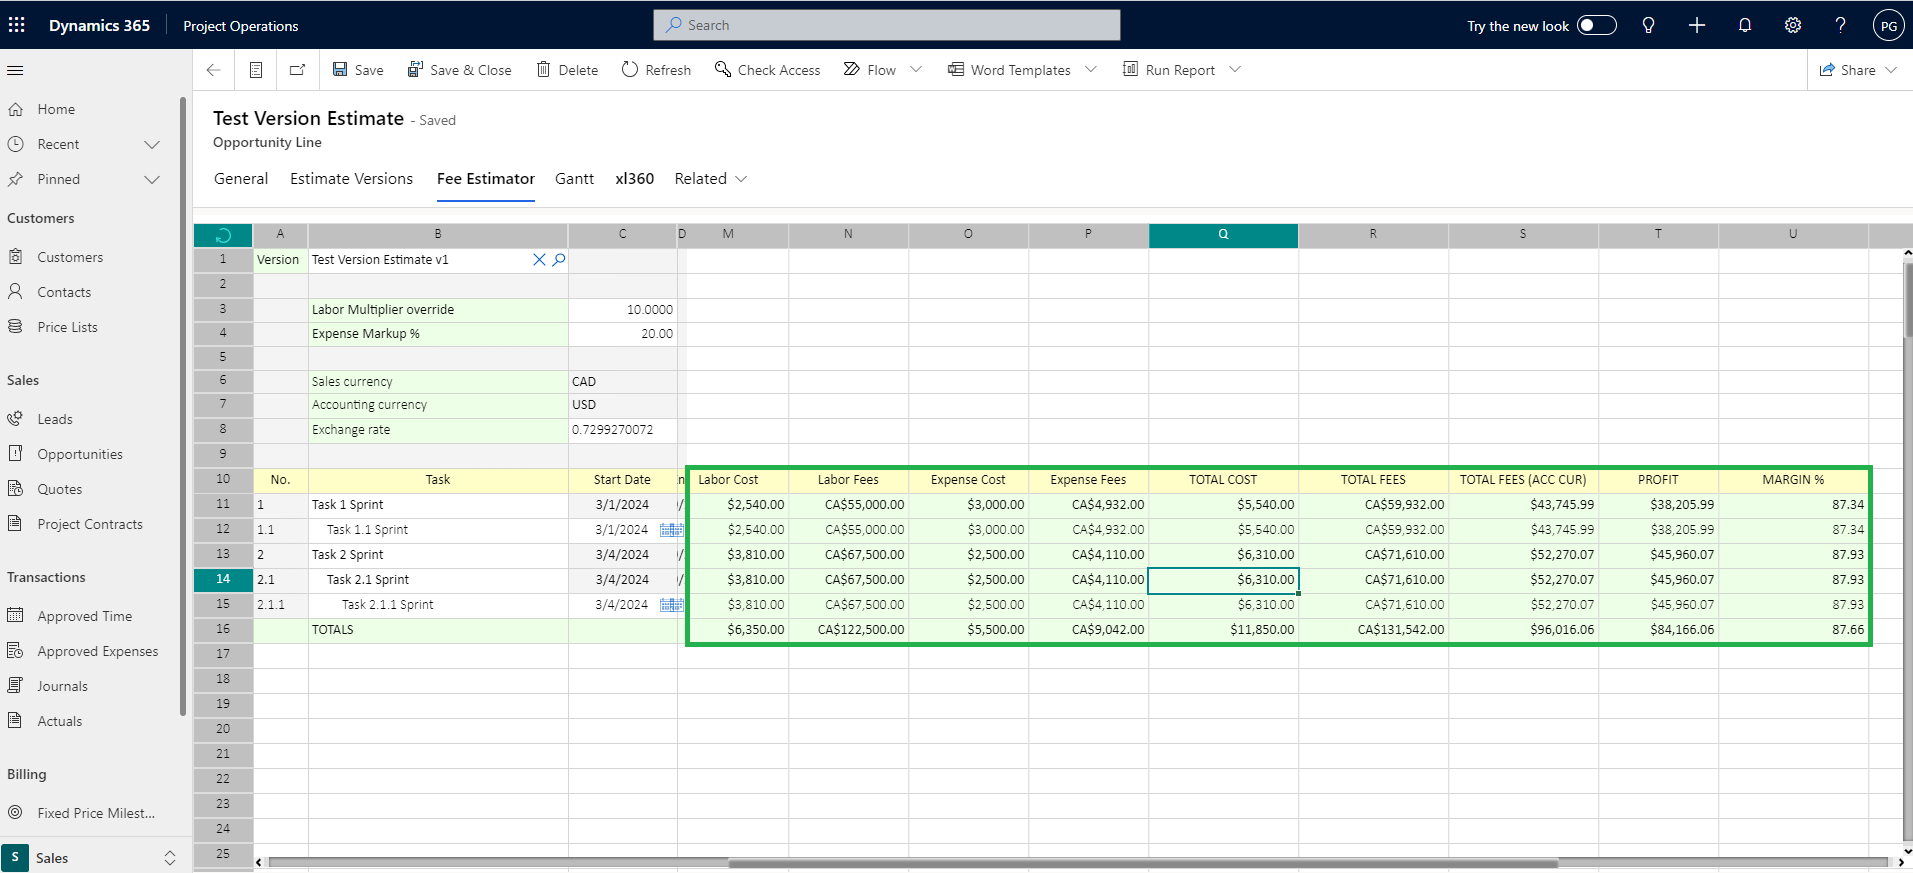
| Fields | Description |
| Labor Cost | “Labor Cost” adds up the costs of all roles/resources assigned to different tasks in Accounting Currency. These costs come from the “Cost Price” list set in your company’s settings. |
| Labor Fees | The “Labor Fees” is sum of all the Sales Amount from all the tasks in Sales Currency. |
| Expense Cost | The “Expense Cost” is the total of all the different costs added up for each task in Accounting Currency. |
| Expense Fees | “Expense Fees” are the total sum of all Sales Amounts for Expense Items defined at every task level in Sales Currency. |
| Total Cost | The “Total Cost” is the sum of the “Labor Cost” and the “Expense Cost” for a task in Accounting Currency. |
| Total Fees | The “Total Fees” is the sum of the “Labor Fees” and the “Expense Fees” for a task Sales Currency. |
| Total Fees(ACC CUR) |
|
| Profit | The WBS can be used to track and analyze the actual profit for a project by comparing the actual costs incurred with the originally planned costs and sales price. Profit = Total Fees (ACC CUR) – Total Cost. |
| Margin % | Margin percentage in a Work Breakdown Structure (WBS) is a measure of the profit or markup applied to the cost of work at each level of the breakdown. Margin % = Profit/ Total Fees (ACC CUR). |