
Effort Allocation is enhanced to use our new “WBS planner” feature leveraging the new xl360 Canvas platform.
- Effort Allocation displays the resources and effort assigned to the WBS tasks, allowing to visualise and maintain the information in different time units such as day, week, month, or year.
This view also provides the following capabilities: - Assign new team members to tasks.
- Maintain the project structure adding new tasks, subtasks.
Configuration
The Enhanced “Effort Allocation” will be activated automatically when “WBS Planner (Preview)” feature is activated. The enhanced experience will allow users to maintain Tasks, Team members and Effort assignments directly from the same “Effort allocation” screen.
Go to Settings > General > Parameters > Projects360 > Enable WBS Planner
Go to Settings > General > Parameters > Projects360 > Enable Effort Allocation
Details of the fields required for Enhanced Effort Allocation functionality are as follows:
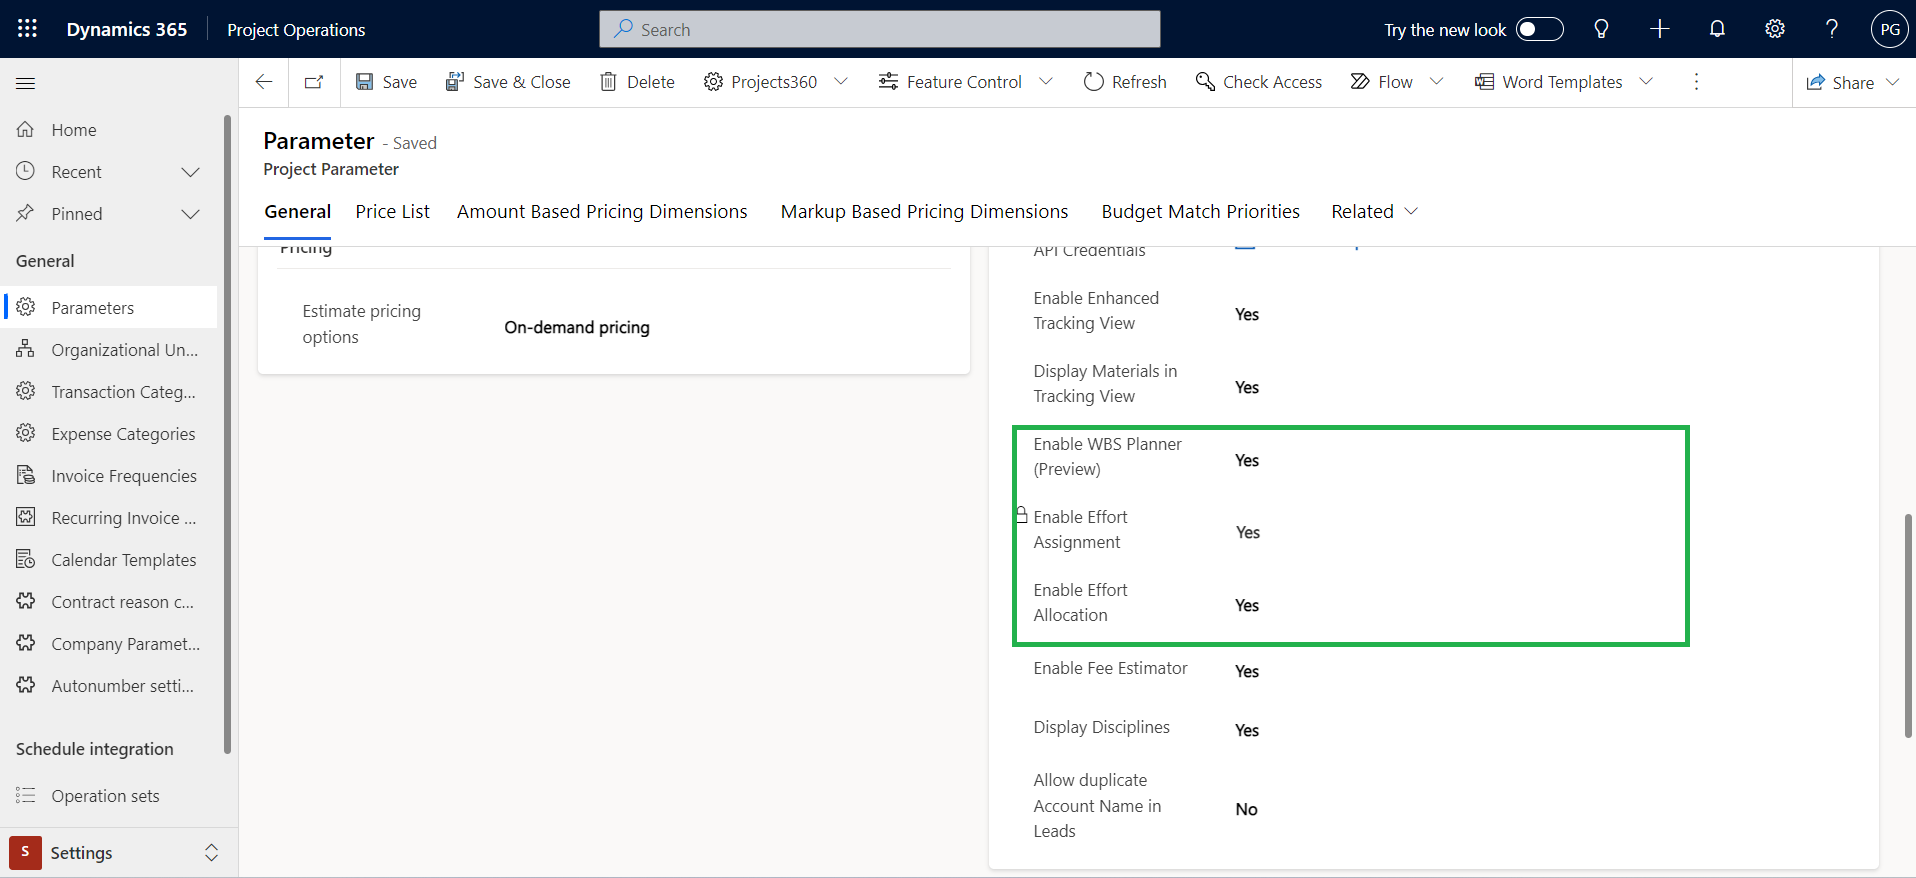
| Fields | Description |
| Enable WBS Planner | Set as “Yes” to activate the new projects360 “WBS Planner” spreadsheet within the Project form. |
| Enable Effort Assignment | Set as “Yes” to activate the new projects360 “Effort Assignment” spreadsheet within the Project form. |
| Enable Effort Allocation | Set as “Yes” to activate the projects360 “Effort Allocation” spreadsheet within the Project form. |
Enhanced Effort Allocation
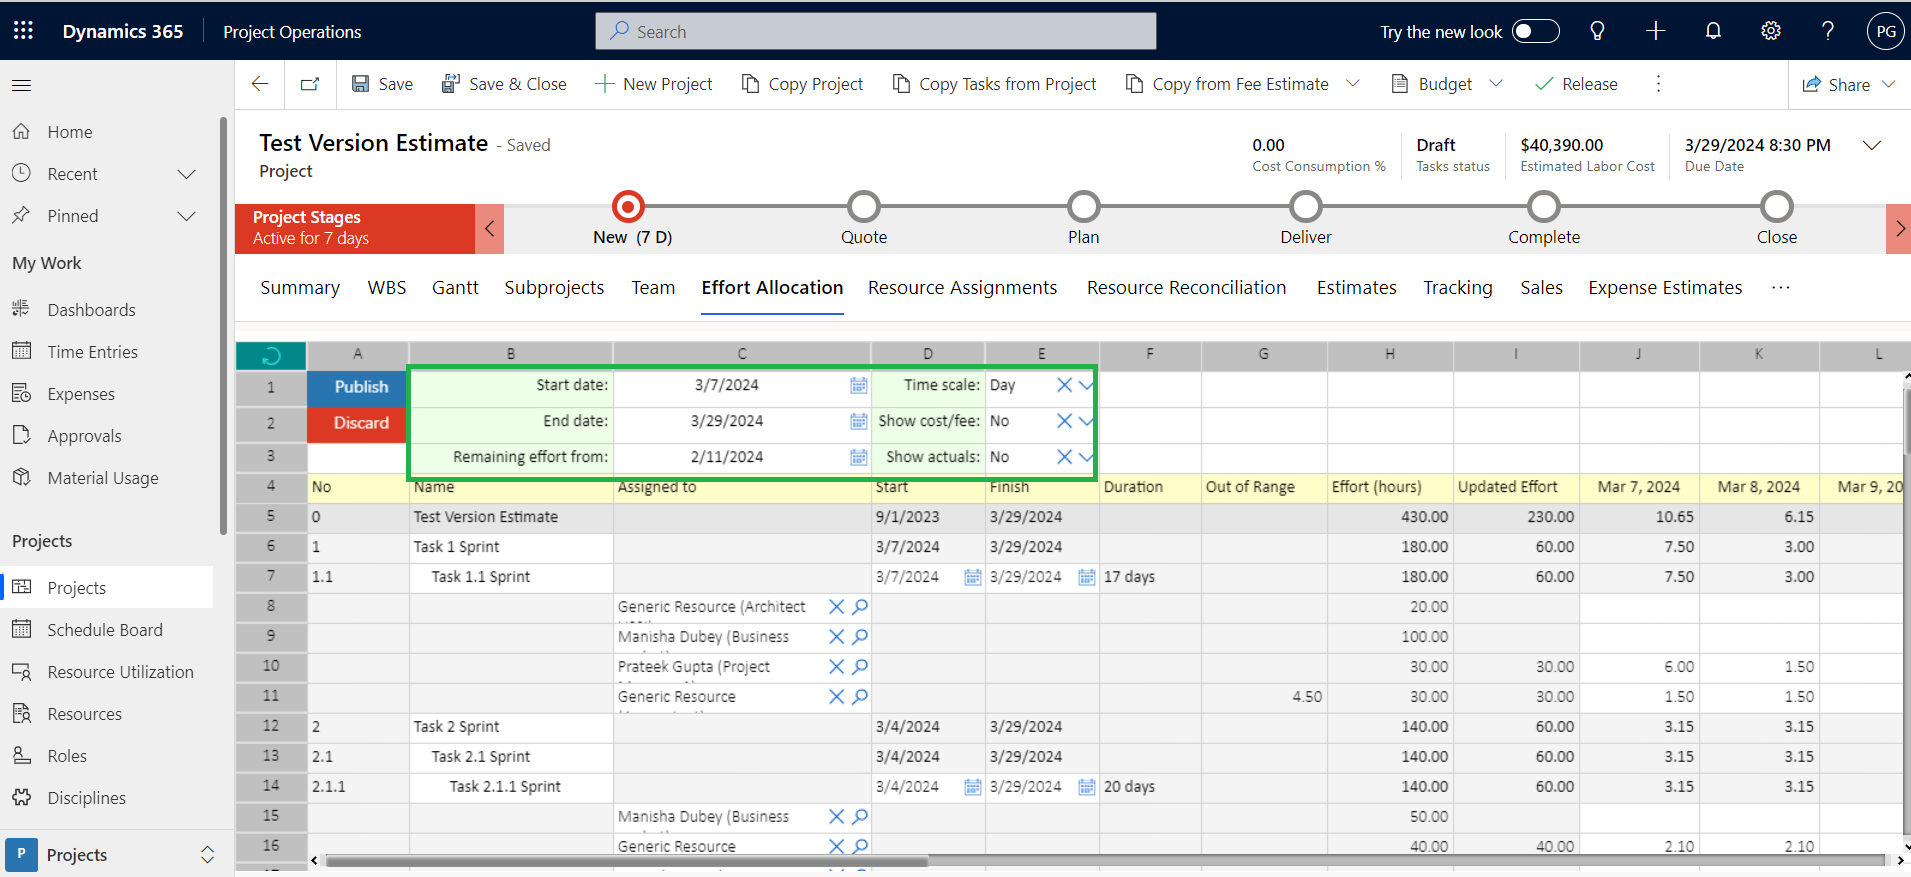
The Effort Allocation Spreadsheet has basic fields like start and end dates for each task, which match the ones in the WBS. It also lets you choose how often you want to track time (daily, weekly, etc.). Based on this choice and the costs for each person working on the tasks, it estimates how much everything will cost. Users can then compare this estimate to the actual costs by turning on the “Show Actuals” feature.
To better understand, let’s take a closer look at these fields.
| Fields | Description |
| Start Date | When you set a start date for a task in the WBS, it automatically shows up on the Effort Allocation spreadsheet. If you change the start date later, the Effort Allocation automatically updates to reflect the new dates. |
| End Date | The end date for each task in the WBS automatically sets the end date for that task in the Effort Allocation spreadsheet. You can change the end date in the spreadsheet, and this will directly affect how much time each person is assigned to the task. |
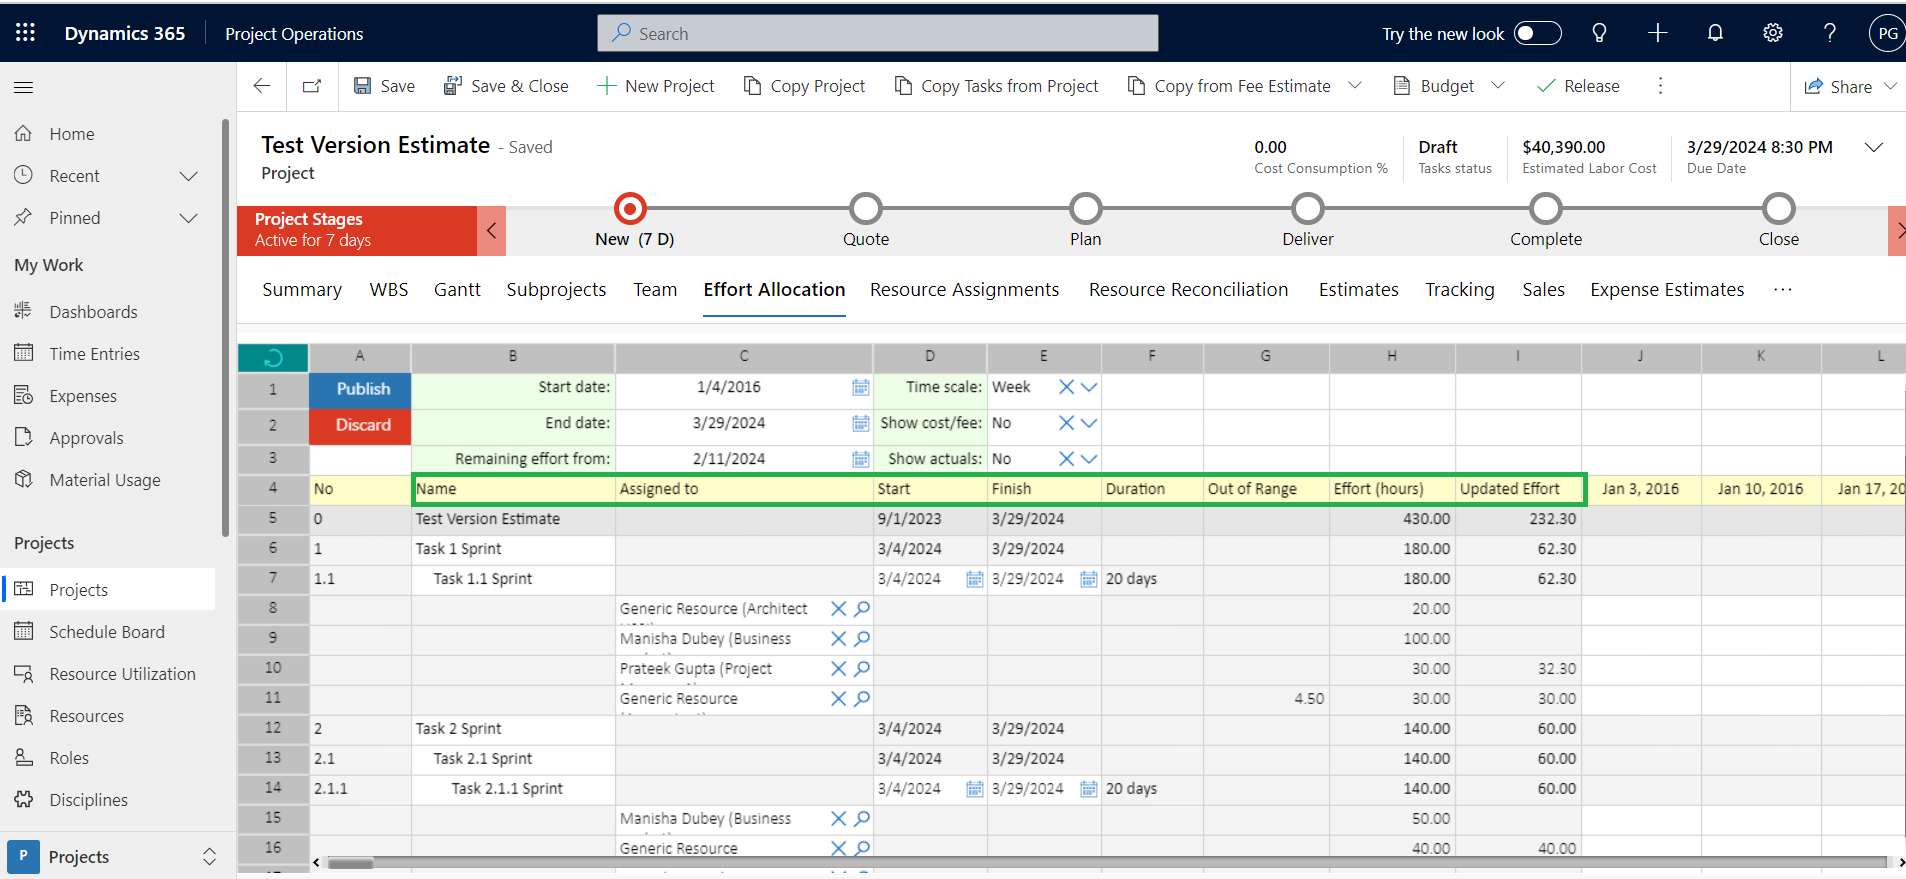
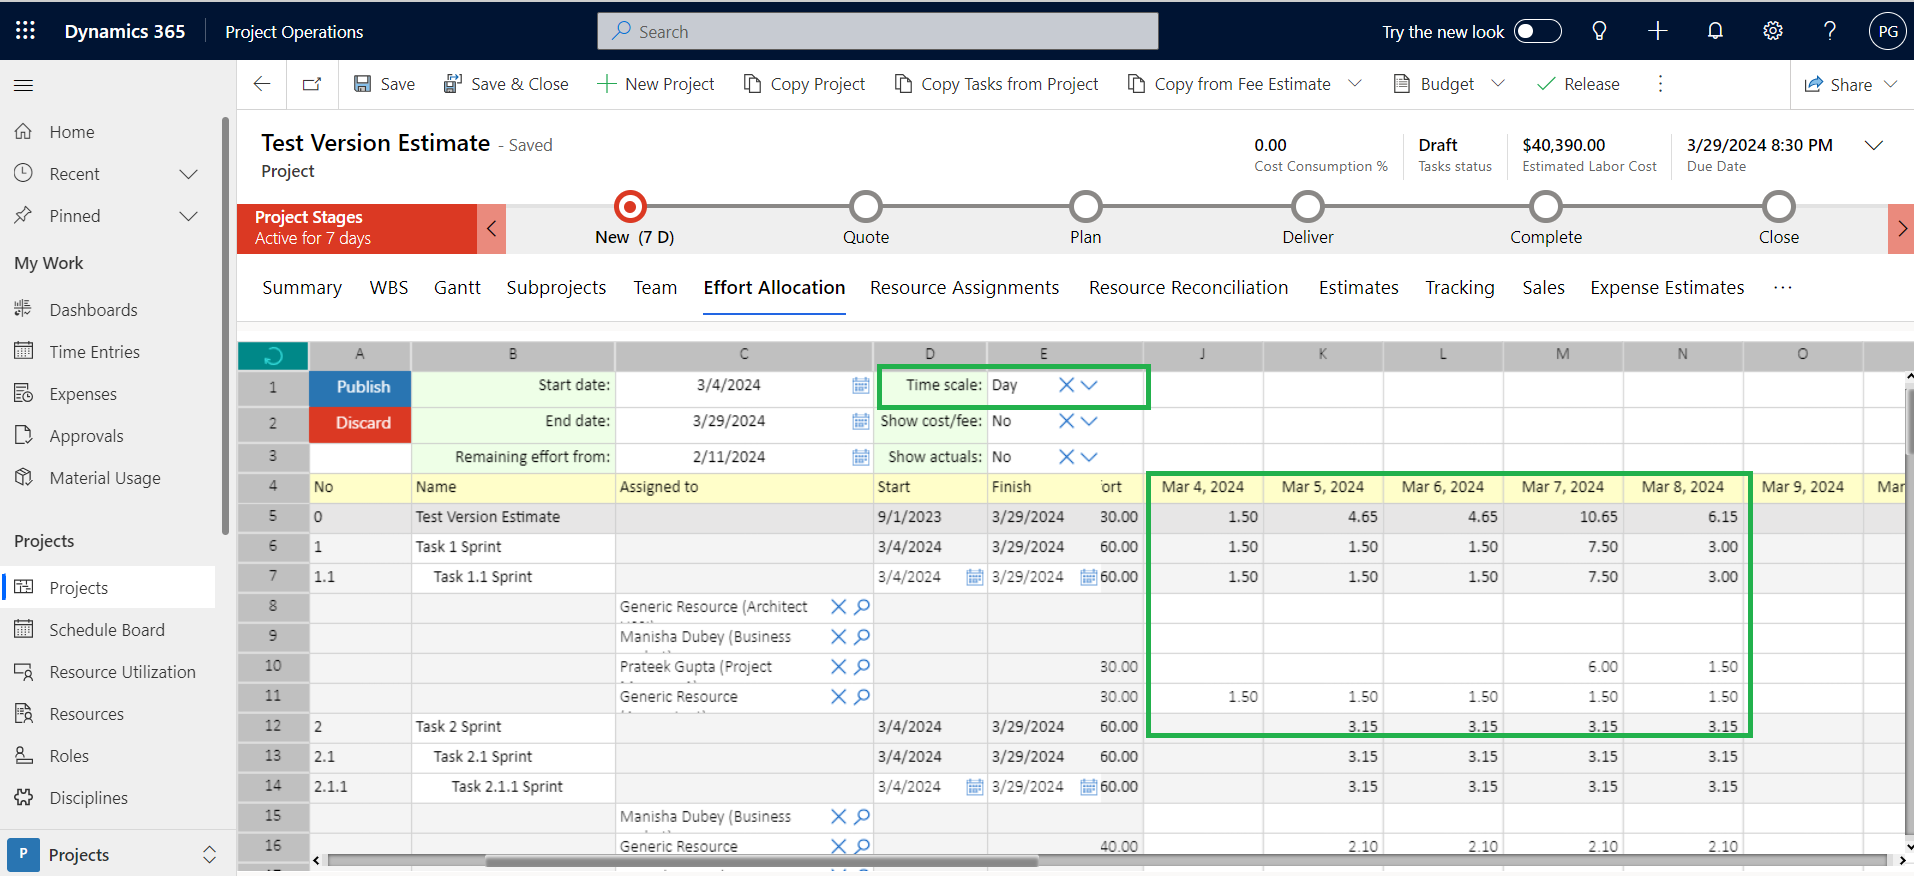
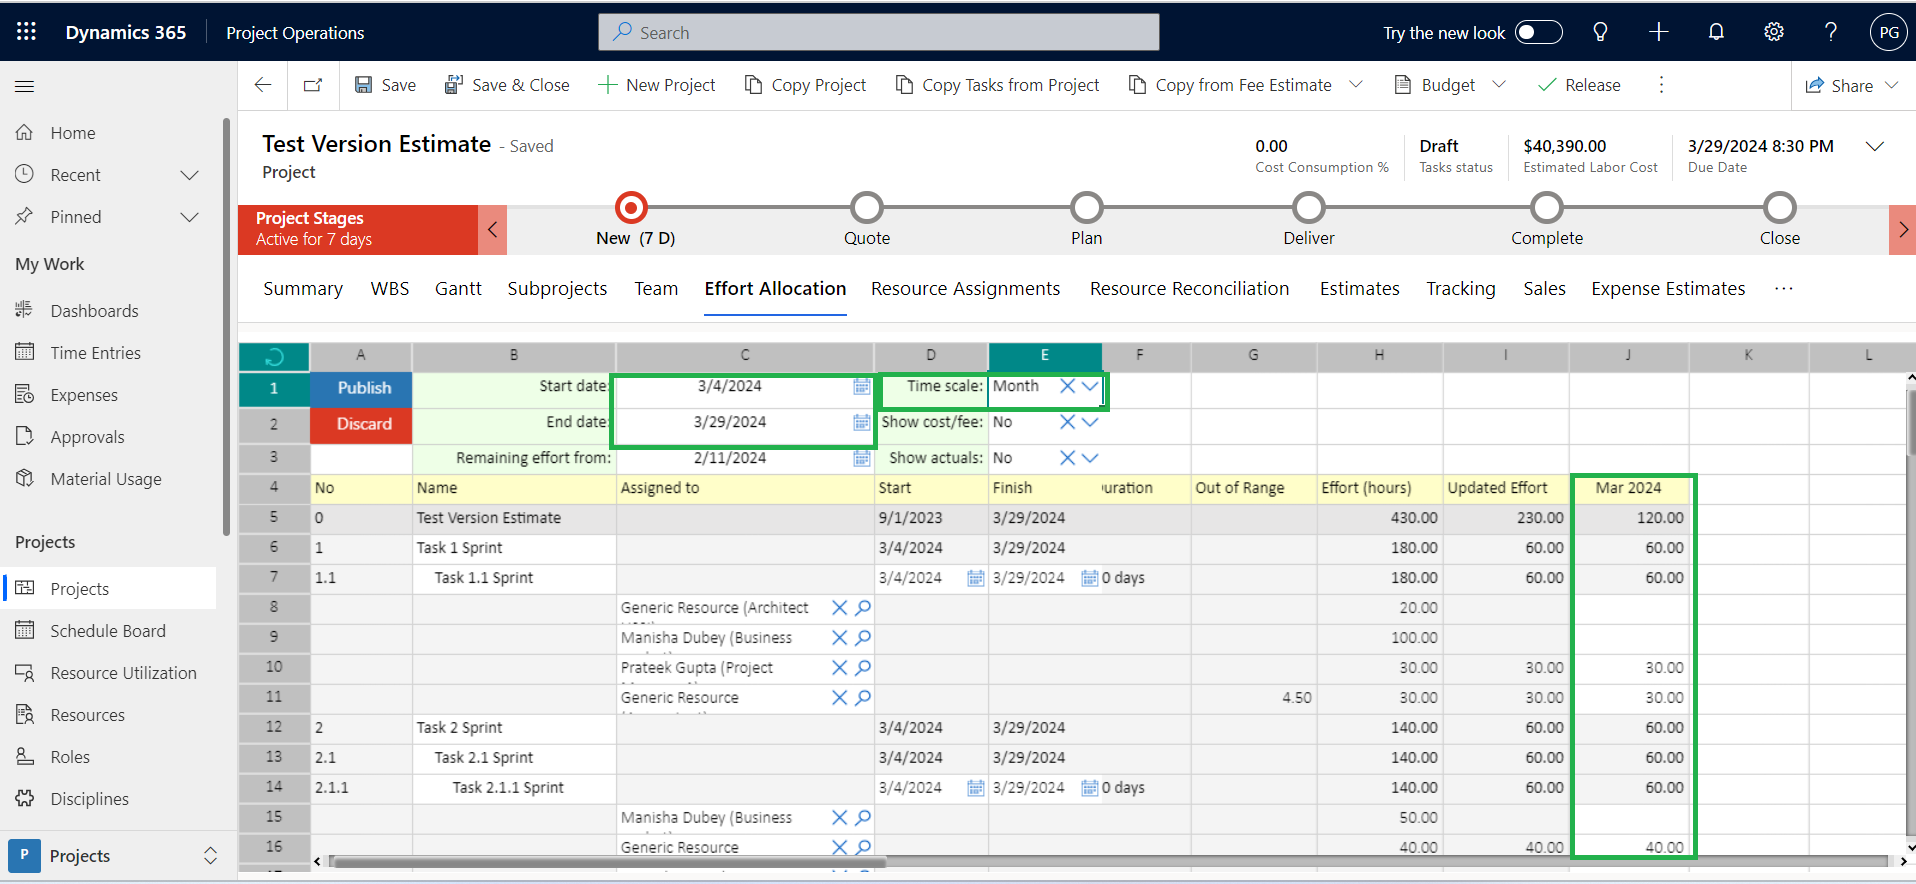
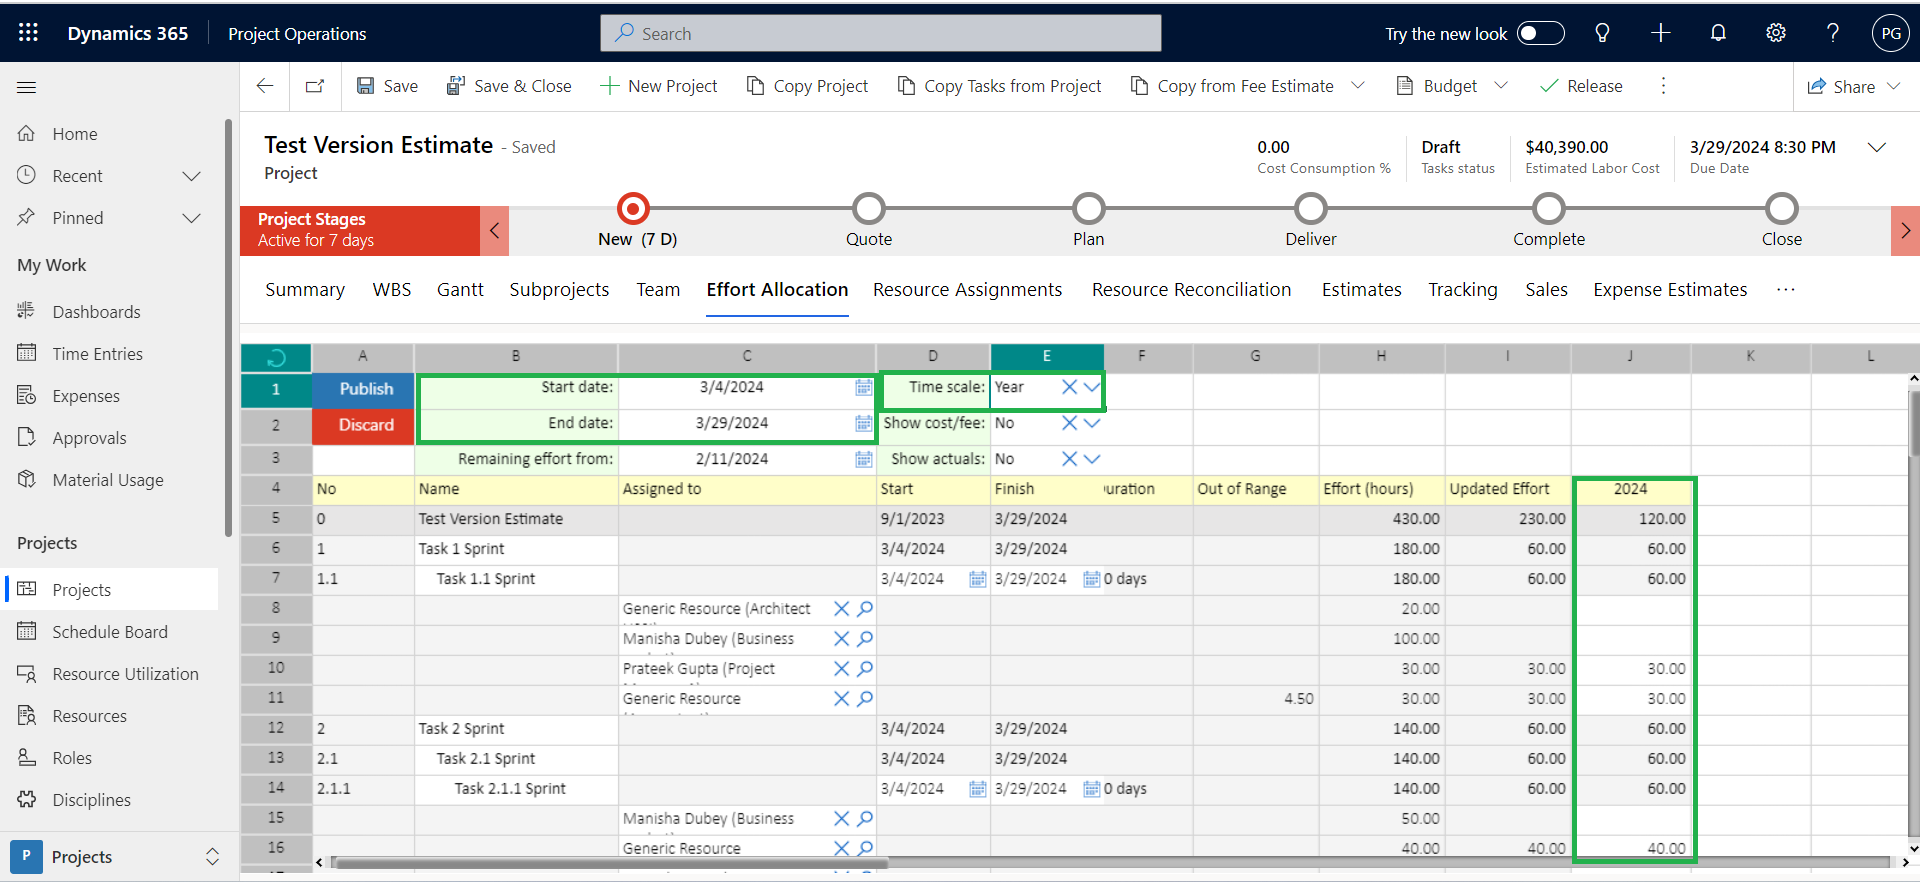
| Time Scale | The “Time Scale” lets users see different views of project data like effort, cost, fees, and actuals for people working on tasks. It shows this information based on what time frame they’re interested in, like daily, weekly, monthly, or yearly. Remember, this view depends on the start and end dates entered in the Effort Allocation spreadsheet, so changing those dates will update the information you see. |
| Show Cost/Fee | “Show Cost/Fee” makes it easy to see estimated costs and fees for each task.
|
| Show Actuals | “Show Actuals” gives you a clear view of :
|
 |
Note – Changes to hours for individual roles in the WBS automatically update the Effort Allocation spreadsheet. However, changing efforts directly in the Effort Allocation spreadsheet won’t update the WBS until you click “Publish.” So remember, updates flow one way automatically, but the other way needs a final confirmation. This means you can budget and estimate how much resources each task needs, all within the Effort Allocation spreadsheet and reflected in the WBS whenever you save your changes. |
To understand how effort allocation, cost, and fees for Roles/Resources working on tasks can be affected, let’s look at a few scenario.
Scenario 1: When Time Scale is set as “Week” and Show Cost/Fee is set as “No” and Show Actuals is also set as “No”.
Users can see this information for the whole project (header level) and for each person working on it (individual level). Since it is set to weekly, it shows hours worked week by week. This report updates automatically if you change the time frame to daily, monthly, or yearly. Let’s take a closer look at each field.
| Fields | Description |
| Name | The “Name” column shows both the project name and any tasks inside that project. This information is shown for both the main project and all its subtasks. |
| Assigned to | The “Assigned to” field shows who’s working on each task, including their names and assigned roles. This helps users easily see everyone involvement in each task. If users are not sure whom to assign to a task, a generic resource will be automatically assigned and shown in the “Assigned to” field. Right-clicking “Assigned to” allows for efficient resource allocation. You can assign existing Bookable resource or create new generic resources, facilitating resource booking.
|
| Start | When creating a project, the start date is automatically set to the earliest start date of all its subtasks. You can still see the start date of each individual task. You can even change them one by one, and these changes will update in the WBS once you save them. |
| Finish | When creating a project, the finish date is automatically set to the latest date of all its subtasks. You can still see the finish date for each individual task. You can even change them one by one, and these changes will update in the WBS once you save them. |
| Duration | Task duration shows how many workdays it takes in total, from start to finish. But it only counts actual workdays for tasks where someone is assigned. |
| Out of Range | The “Out of Range” field shows the total efforts of resources that do not fall between the start date and end date of the task. |
| Effort | When tasks are automatically created from the WBS, their effort levels generates from the WBS itself. You can’t directly change these values in the Effort Allocation spreadsheet. However, you can adjust the effort for each resource by choosing a specific timeframe (daily, weekly, etc.). These adjustments will increase or decrease the overall effort and update both the resource level and task level in the Effort Allocation spreadsheet and WBS once you publish the changes. |
| Updated Effort | When you first assign resources to tasks from the WBS, the “Effort” and “Updated Effort” fields show the same amount of time. But the “Effort Allocation” tool lets you adjust the time each resource spends on a task (increase or decrease it). These changes automatically update the “Updated Effort” field for both the resource and the overall task. |
When you open the Effort Allocation spreadsheet, you can choose how you want to see time, like by day, week, or year. This lets you see the Resource allocation and assignment details for that specific timeframe.
- When you choose “Day” for the time scale, you will see all the dates from the start date at the top to the end date at the bottom in the Effort Allocation spreadsheet. But remember, it only shows effort for workdays. For non-working days, you won’t see any data.
- When you choose “Weekly” in the Time scale, you’ll see the weekly schedule based on the spreadsheet’s start and end dates. The total effort for each week is shown at the resource level, task level, and summed up for the entire project. You can only adjust the effort at the resource level, and these changes will update both the “Effort” and “Updated Effort” fields for both resources and tasks.

- When you choose “Monthly” as the time scale, the system shows the month for each task’s start and end date. It then groups effort by month for resources, tasks, and the whole project. You can only adjust effort for resources, and those changes affect both the original “Effort” and the updated “Updated Effort” fields at both the resource and task levels.
- When you choose “Yearly” as the time scale, you’ll see which year each task start and end date falls in. This way, you can easily see the total effort for each year, both for individual resources and tasks, as well as the overall project total. You can only adjust the effort for individual resources within this view, and the changes will affect both the “Effort” and “Updated Effort” fields for both the resource and the task.
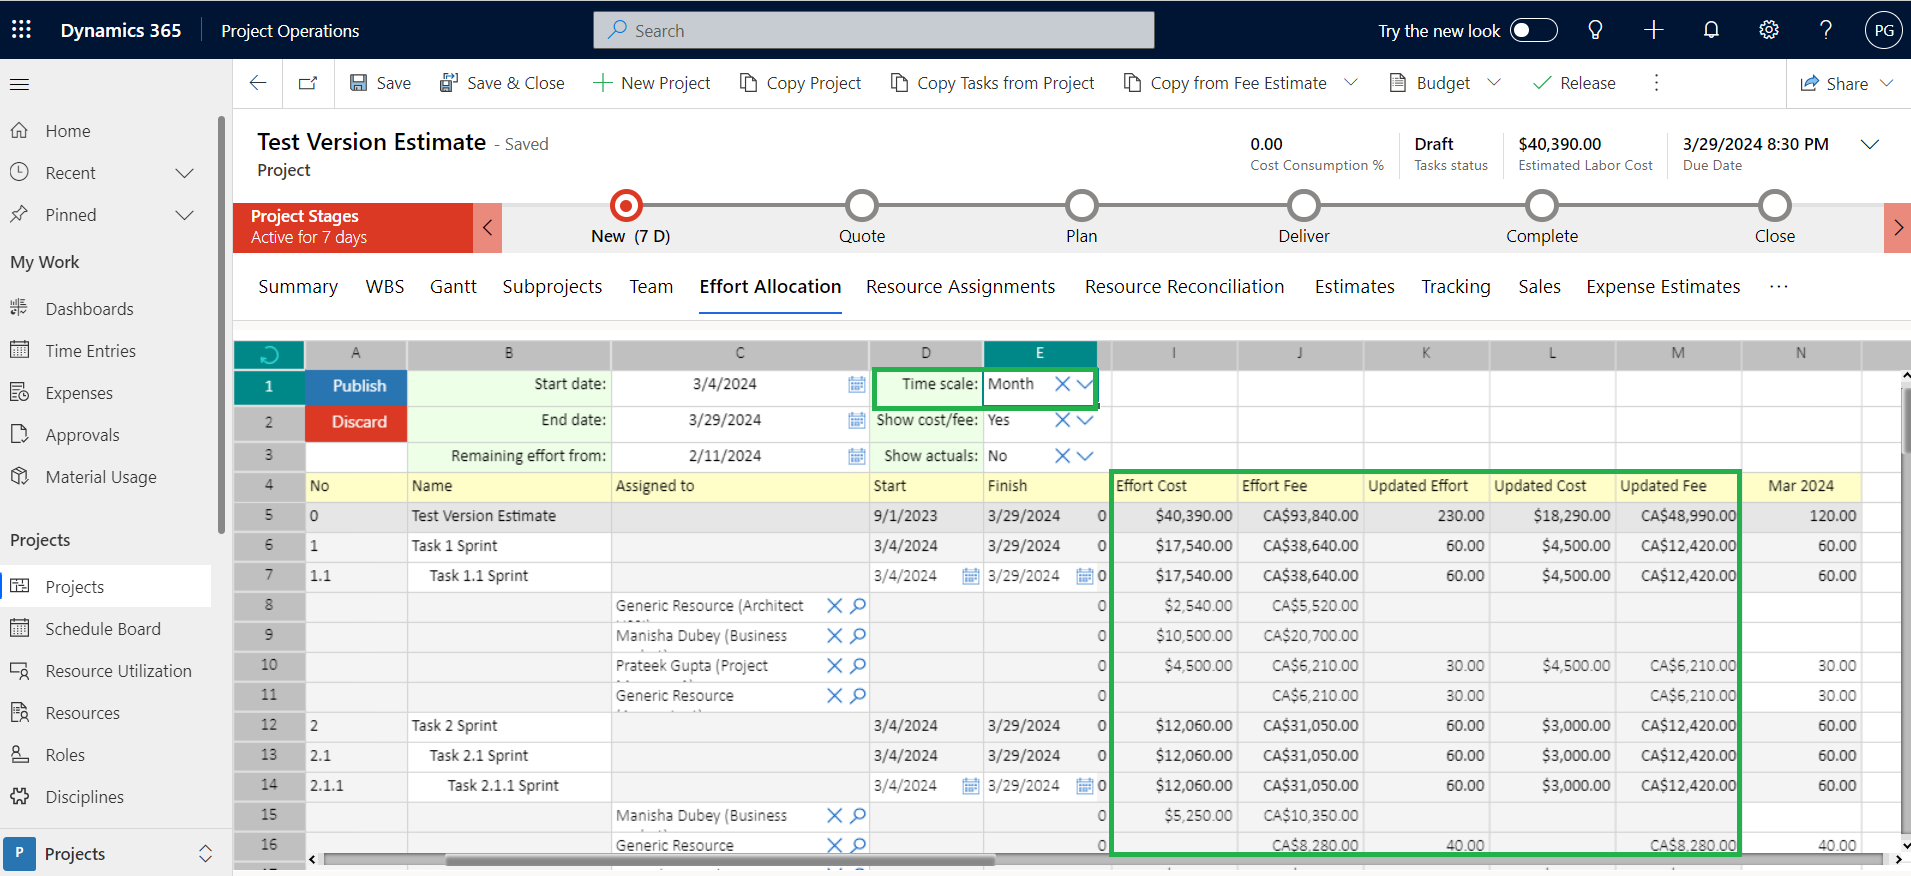
Scenario 2: When Time Scale is set as “Month” and Show Cost/Fee is set as “Yes” and Show Actuals is set as “No”.
If you turn on “Show Cost/Fee” in the Effort Allocation spreadsheet, you’ll see all the information from before (like in Scenario 1) plus some new fields. These new ones track both cost and fees, like “Effort Cost” and “Updated Effort Cost”. Let’s dive into one of these new fields:
| Fields | Description |
| Effort Cost | “Effort Cost” shows how much it costs to have each person work on a task. The total cost adds up for each task and is shown at the top. It’s calculated by formula Effort Cost : Effort(Hours) * Cost price of Role/Resource. We set these rates in the “Cost Price” list under Project Parameter settings. |
| Updated Effort Cost | The “Updated Effort Cost” shows how much it costs to have people working on each task. This cost is calculated by formula Updated Effort Cost : Updated Effort * Cost Price of the Resource/Role. You can change the Updated Effort for each person to adjust the overall cost. All these costs are added up and shown at the top of each task. |
| Effort Fee | The Effort Fee shows how much each assigned resource will cost based on their effort (time spent) and hourly rate. The total cost for each task is shown at the top. Here’s how it works:
|
| Updated Effort Fee | The “Updated Effort Fee” shows the total cost for each assigned resource on a task. This cost of Updated Effort Fee : Resource’s updated effort (how much time they spend on the task) * hourly rate (set in the cost price list). It also gets added up for all resources working on the same task, giving you a total “Updated Effort Fee” for the whole task. |
|
Note – Once you make changes in the “Effort Allocation” spreadsheet and publish it, the number of hours each person spends on a task (Efforts) will eventually match the updated hours. This means the cost and fee for each person’s effort will also be updated. Basically, everything gets recalculated in the WBS to reflect the new effort levels, including hours, sales, and costs for each resource assigned to tasks. |
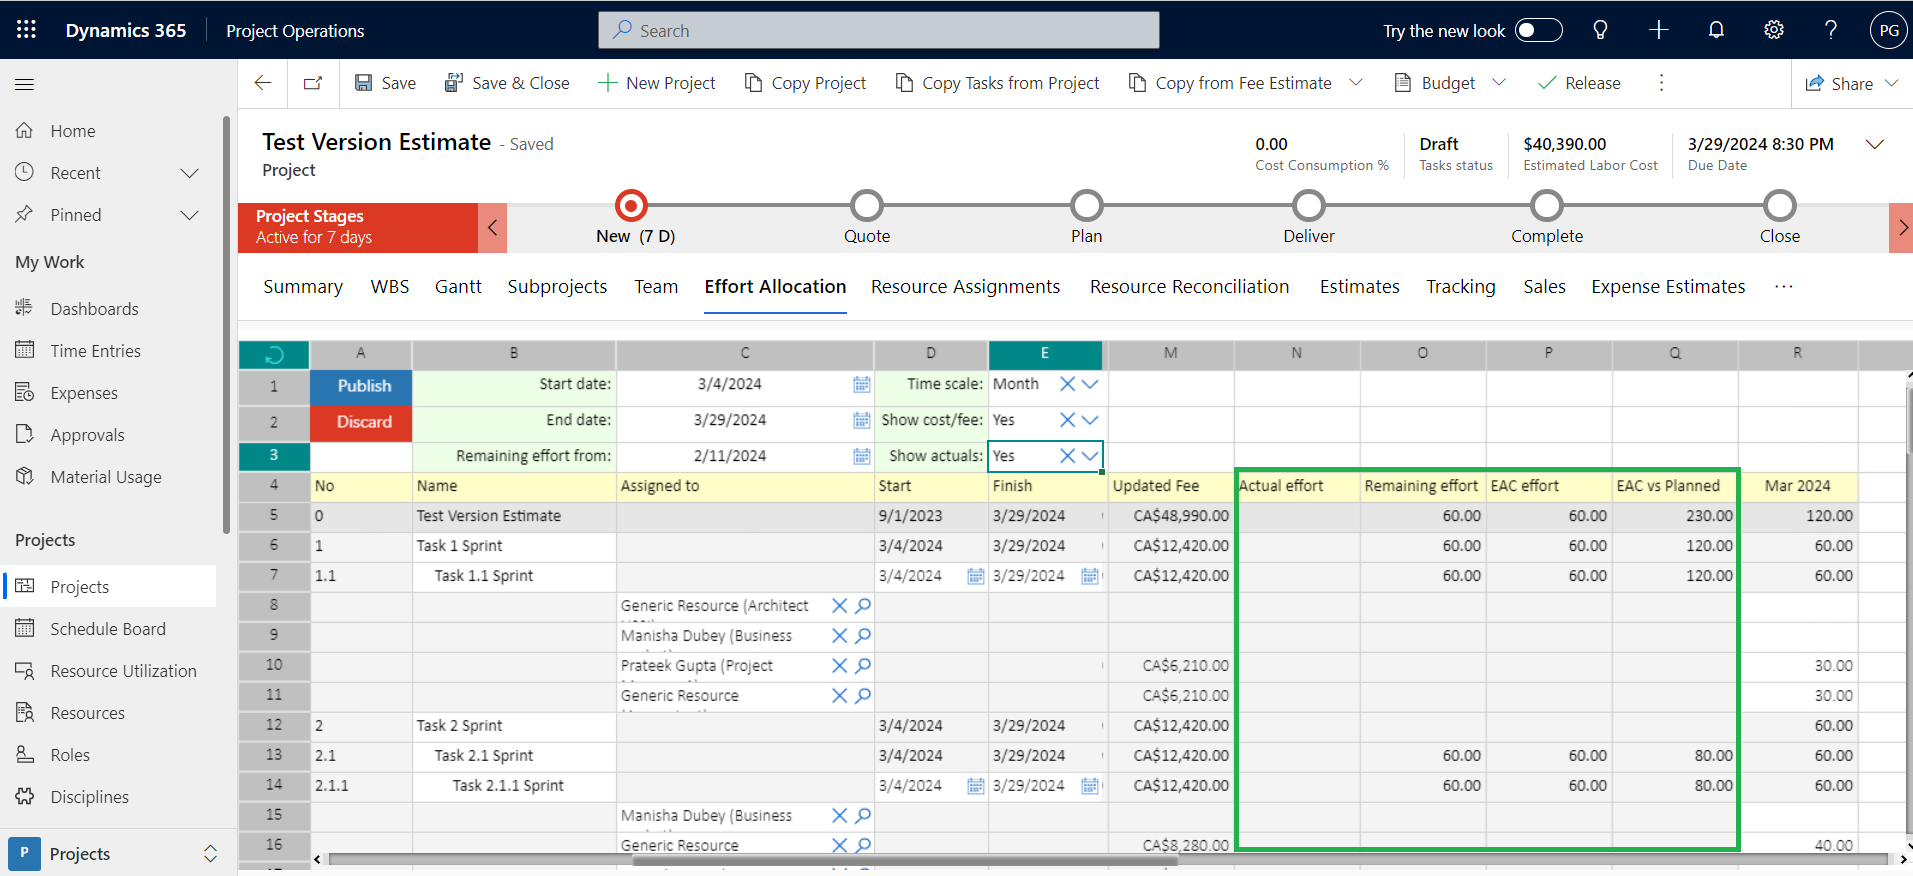
Scenario 3 : When Time Scale is set as “Yearly” and Show Cost/Fee is set as “Yes” and Show Actuals is set as “Yes”.
Turning on “Show Actuals” in the Effort Allocation spreadsheet shows even more information! You’ll see everything from Scenario 1 and 2, plus additional fields like :
| Fields | Description |
| Actual Effort | The “Actual Effort” field shows the total time people actually spent on each task. This gets added up to show the total project time at the top of the spreadsheet. Once Actual efforts are updated, it can’t be edited again. |
| Remaining Effort | The “Remaining Effort” shows how much work is left on each task. It’s calculated by adding up the estimated time for all assigned resources and displaying it both at the individual task level and as a combined total for the entire project at the top of the spreadsheet. |
| EAC Effort | “EAC Effort” in project management refers to the Estimate at Completion (EAC) of effort required to complete a project.EAC effort helps users in assessing project performance, making adjustments to resource allocation, and ensuring that the project stays on track to meet its goal. |
| EAC vs Planned | It is the total planned value for the project, determined at the beginning of the project and based on the project work. |