The Work Breakdown Structure helps users break down a project into smaller tasks and assign people or teams to do them. Users can easily estimate both labor and expense costs for their projects. The WBS helps by providing details about the roles involved and expenses incurred for each defined task. This makes it easier to track everything in a clear and organized way. The WBS is a helpful tool because everyone on the team can break down tasks, add smaller subtasks, and assign resources and expenses.
The WBS is a complete tool for users because it lets them track project estimates from different versions of a proposal. You can easily copy budgets and forecasts from the Fee Estimator to the WBS. Then, you can adjust things as needed by adding roles, expenses, or even new tasks. This automatically updates the overall estimates for labor, expense cost, effort allocation, and individual task expenses.
We decided to create the Work Breakdown Structure (WBS) feature because we noticed some things:
- Using tasks in Project Operations normally needs extra licensing with Microsoft Project Online. But the good news is, the Work Breakdown Structure (WBS) planner comes built-in! This means anyone on your project team can add tasks and estimate expenses and resources, as long as they have the right permissions.
- The WBS helps break down projects into smaller tasks, showing both the expected cost and sales price for each. It also calculates the profit and profit margin, making it easy for everyone to understand the financial picture of the project.
- This feature leverages the new xl360 platform built as canvas application.
- Disconnected from MS P4W, it will allow us to use almost unlimited level of tasks and resource assignments
- Tasks, Team members, Expenses and Effort assignments can be maintained on real time from a single screen directly in the Project form.
Configuration
The section highlighted below are the mandatory setups that needs to be configured by System Admin to use the WBS Planner.This feature can be enabled from the Parameters.
“WBS Planner (Preview)” is a key new feature that will replace MS Projects for the Web when activated. This feature will allow users to maintain the project structure, fee and expense estimates as well as resource assignment from just one view.
Go to Settings > General > Parameters -> Project360 -> Enable WBS Planner
Details of the fields required for WBS Planner Functionality are as follows:
| Fields | Description |
| Enable WBS Planner | Set as “Yes” to activate the new projects360 “WBS Planner” spreadsheet within the Project form. |
| Enable Effort Assignment | Set as “Yes” to activate the new projects360 “Effort Assignment” spreadsheet within the Project form. |
| Note – This is a “Preview” feature, and it can be activated and deactivated by configuration. Implementations using MS P4W can continue using it. |
Work Breakdown Structure
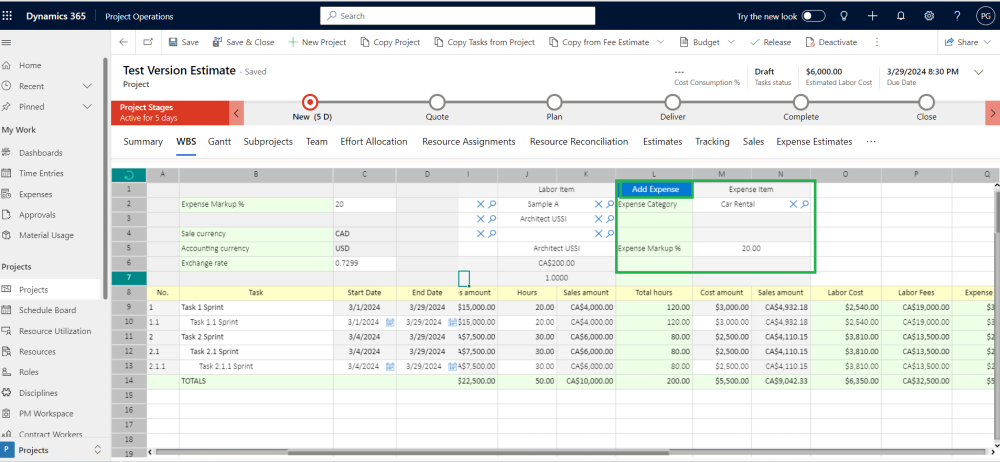
If you click on the WBS tab and copy Estimates using the “Copy from Fee Estimates Button”, all the Tasks, Roles, Expenses, Total Cost, Sales, Margin, Profit%, etc., will be transferred from the selected version. If no Estimates need to be copied, the WBS will have a Standard spreadsheet with various buttons like “Add Labour” and “Add Expense Button”, and multiple fields such as Expense Markup%, Sales Currency, etc.
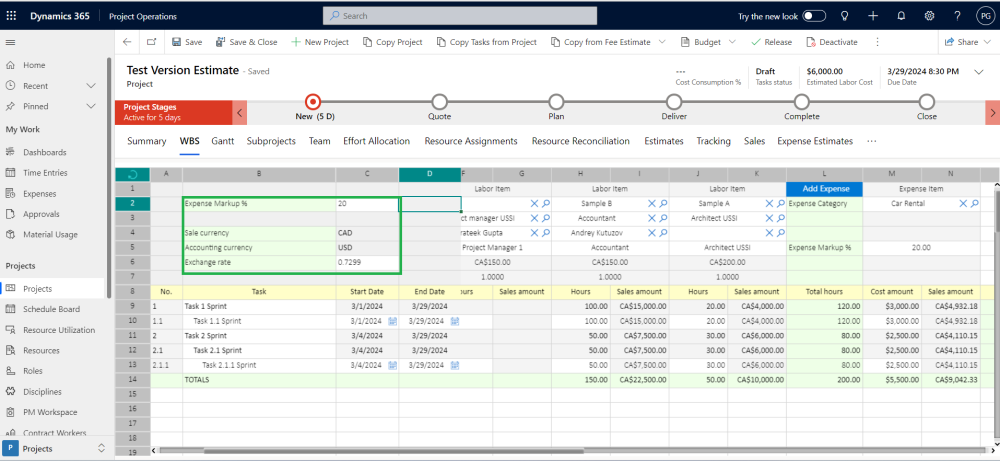
The fields on the top left of WBS in the WBS planner spreadsheet are as follows:
| Fields | Description |
| Expense Markup Percentage |
|
| Sales Currency | Sales Currency shows the currency of Contract related to the Project. |
| Accounting Currency | Accounting Currency shows the currency of the “Contracting unit Company” to which the Project belongs. This means that WBS will use the same currency as the Project itself. |
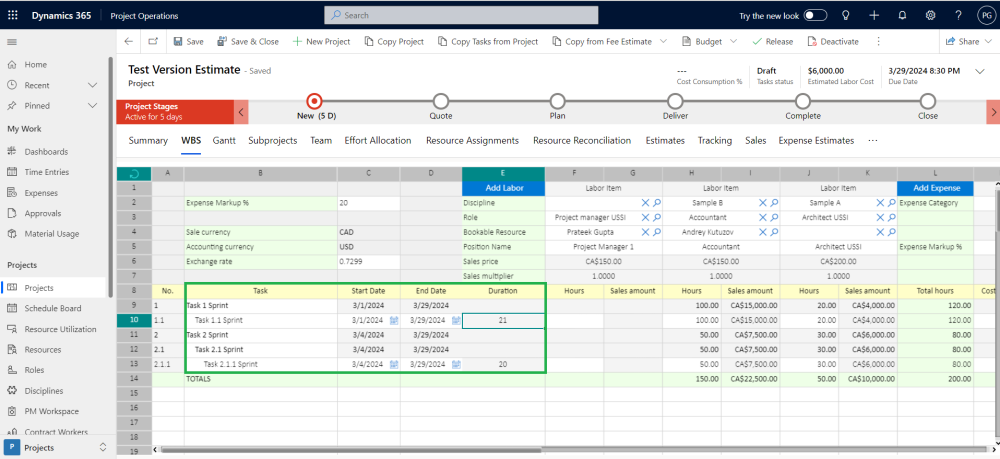
The fields highlighted in yellow contain the list of Tasks to be defined in the WBS. These tasks can be added manually or copied from Fee Estimates.
| Fields | Description |
| Task |
|
| Start Date | Define the Start Date of Task. |
| End Date | Define the End Date of Task. |
| Duration | It is calculated based on the start and end dates you set. The difference between those dates determines how long the task takes. |
There are two helpful blue buttons in the WBS that make managing roles and expenses easier:
Add Labor button :
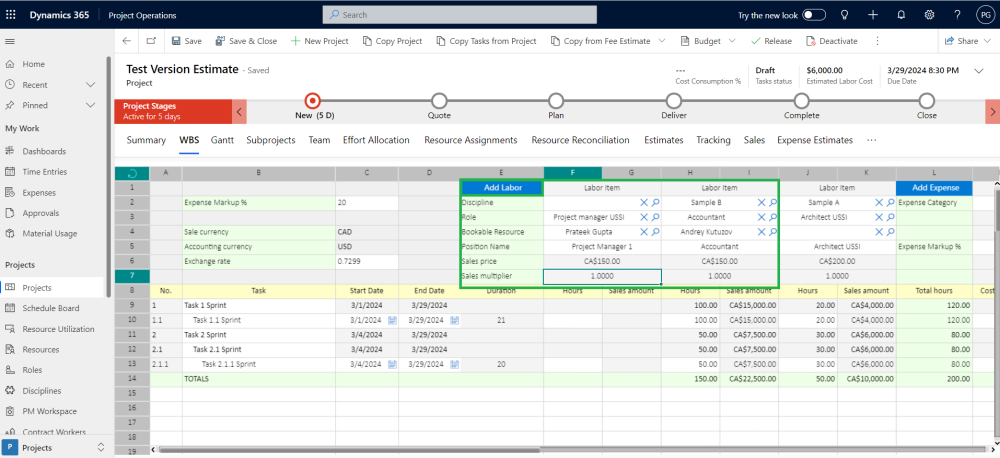
Clicking the “Add Labour” button opens a list where you can choose roles for a task. Click it multiple times to add as many roles as needed, making it easier to set budgets for everyone working on it. By default, you’ll see options like “Role,” “Person available,” “Job title,” “Price you charge,” and “Multiplier for adjusting the price.”
The fields which are part of “Labor button” are:
| Fields | Description |
| Discipline | Disciplines can be defaulted for Roles and Bookable Resources. |
| Role |
|
| Bookable Resource | Click the dropdown menu of Bookable Resources and choose the resource you want from the list. Bookable Resource is an optional field and can be left blank and users can only select the role, blank resources will be interpreted as generic resources by the system. |
| Position Name | When users choose a role, its description will default from the selected role. |
| Sales Price | The Sales Price value will be populated from the Sales Price list related to the Opportunity. |
| Sales Multiplier | The Sales Multiplier will be populated from Sales Price List markup and if there is no markup then it is defaulted as “1”. The Sales multiplier will be applied on top of Sales price to calculate the final Sales Amount. |
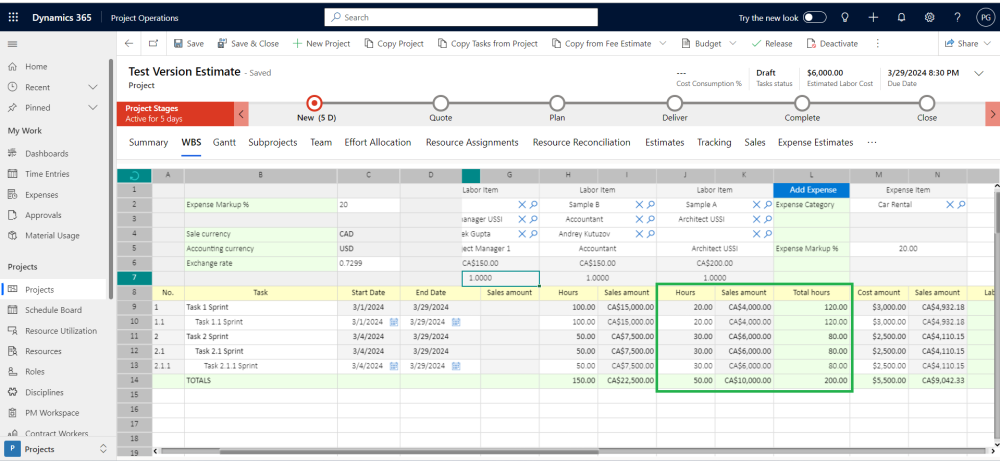
Users also have the flexibility to view different Cost and Sales Estimations for Roles . This helps them get an overview of the forecasting and make necessary adjustments if needed. Once labor items are added and necessary details are either auto-generated or manually added, users will be able to see below fields under different labor items.
| Fields | Description |
| Hours | Users must manually input the total number of hours for the labor they will perform on a particular task. |
| Sales Amount | The Sales Amount of the Labor/Role will be calculated as Sales Price * Sales Multiplier * Hours. |
| Total Hours | Total Hours is the total number of hours estimated for labor across all tasks.
|
Add Expense Button
Clicking the “Add Expense” button lets you add different costs to a task. Click it multiple times to add as many cost categories as you need, making it easy to track everything. When you do this, you’ll see fields like:
| Fields | Description |
| Expense Category | The “Expense Category” field shows you all the types of expenses that are currently used in your system. |
| Expense Markup % | If you choose a Expense Markup % in WBS, then that percentage will be shown in the “Expense Markup%” field , but you can still change it for each individual expense category you add. |
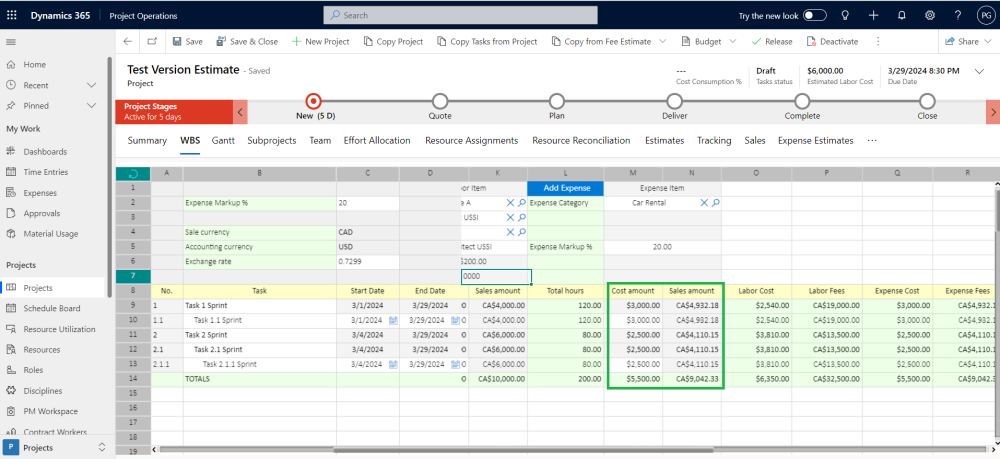
After adding expenses and filling in the details, you’ll see both the cost and sales amount for each expense. Here is detailed explanation of both the fields:
| Fields | Description |
| Cost Amount | Users need to enter the cost amount for each expense they added under a expense category. |
| Sales Amount | Sales Amount calculation varies with Sales and Accounting currency, can be demonstrated with help of some scenarios:
|
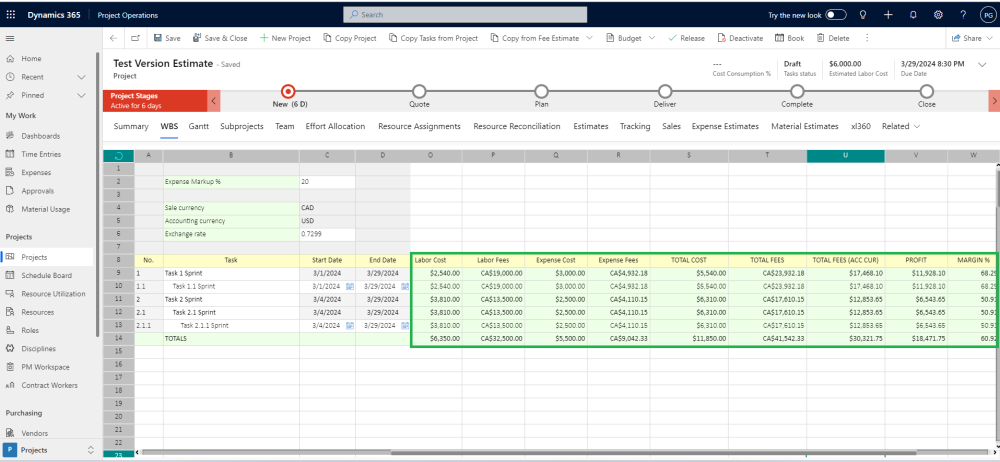
There are even more useful fields in the WBS spreadsheet for managing expenses and roles. Here are the fields description highlighted below.
| Fields | Description |
| Labor Cost | “Labor Cost” adds up the costs of all roles/resources assigned to different tasks in “Accounting Currency”. |
| Labor Fees | The “Labor Fees” is sum of all the Sales Amount from all the tasks in “Sales Currency”. |
| Expense Cost | The “Expense Cost” is the total of all the different costs added up for each task in “Accounting Currency” . |
| Expense Fees | “Expense Fees” are the total sum of all Sales Amounts for Expense Items defined at every task level in “Sales Currency”. |
| Total Cost | The “Total Cost” is the sum of the “Labor Cost” and the “Expense Cost” for a task in “Accounting Currency”. |
| Total Fees | The “Total Fees” is the sum of the “Labor Fees” and the “Expense Fees” for a task in “Sales Currency”. |
| Total Fees(ACC CUR) |
|
| Profit | The WBS can be used to track and analyze the actual profit for a project by comparing the actual costs incurred with the originally planned costs and sales price. Profit = Total Fees (ACC CUR) – Total Cost. |
| Margin % | Margin percentage in a Work Breakdown Structure (WBS) is a measure of the profit or markup applied to the cost of work at each level of the breakdown. Margin % = Profit/ Total Fees (ACC CUR). |
Expense Estimates
Additionally, the manual creation of Expense Estimates is synced with the WBS Planner. This sync ensures that any changes made directly to the expense cost or sales amount in either the WBS tab or the Expense Estimates tab will be reflected in the other.
- Users can still see that the sales amounts for expense items in the WBS change based on applicable exchange rates if they adjust the cost in the WBS first. This functionality continues to be supported. Additionally, the sales amount field for an expense item is now editable in the WBS, allowing users to manually input their own values. This enables the syncing of the cost and sales amount of an expense item in Expense Estimates.
- Users can now also add new expense items by selecting tasks and expense categories with cost and sales in Expense Estimates. These items will directly sync to the WBS under the same task name. Additionally, if a user provides multiple lines of expense items for the same tasks and expense categories in Expense Estimates, the system will create corresponding lines of expense items with the same expense category in the WBS.


